You want to change the model Codex uses, add an MCP server or copy your setup to another computer, and first you need the file. The Codex config.toml location is short to state, but WSL, project files and profile files all add their own copies. This post covers where config.toml lives on each system, the keys people change most, profiles and the [mcp_servers] tables.
Where is the Codex config.toml?
The Codex config basics put it in one line: “Codex stores user-level configuration at ~/.codex/config.toml.” The advanced configuration docs add that Codex keeps its local state under CODEX_HOME, which defaults to ~/.codex, and config.toml is the first file listed there.
| System | User config.toml |
|---|---|
| macOS | ~/.codex/config.toml |
| Linux, Ubuntu included | ~/.codex/config.toml |
| Windows, native Codex and the Windows app | %USERPROFILE%\.codex\config.toml |
| WSL | ~/.codex/config.toml, the Linux home |
CODEX_HOME set |
config.toml in that folder |
The Windows row comes from the Windows app docs: “The Windows app uses the same Codex home directory as native Codex on Windows: %USERPROFILE%\.codex.” The docs give that folder; config.toml sits in it like in any Codex home.
The same folder holds Codex’s local state:
❯ ls ~/.codex# config.toml, plus state such as logs (and history.jsonl if history is on)❯ echo $CODEX_HOME# empty means Codex uses the default, ~/.codexIn the IDE extension you don’t need the path at all: select the gear icon in the top-right corner, then Codex Settings > Open config.toml. The CLI and the IDE extension share the same configuration layers.
WSL and Windows keep separate homes
If you run the Codex CLI inside WSL, it uses the Linux home by default, so it doesn’t automatically share configuration, cached auth or session history with the Windows app. The docs give two ways to share one home:

The second way is one line in WSL. Add it to ~/.bashrc or ~/.zshrc to keep it in every shell:
❯ export CODEX_HOME=/mnt/c/Users/<windows-user>/.codex# points WSL's Codex at the Windows Codex homeThe other config.toml files Codex reads
Your user file is one layer of several. Codex resolves each value in this order, highest precedence first:
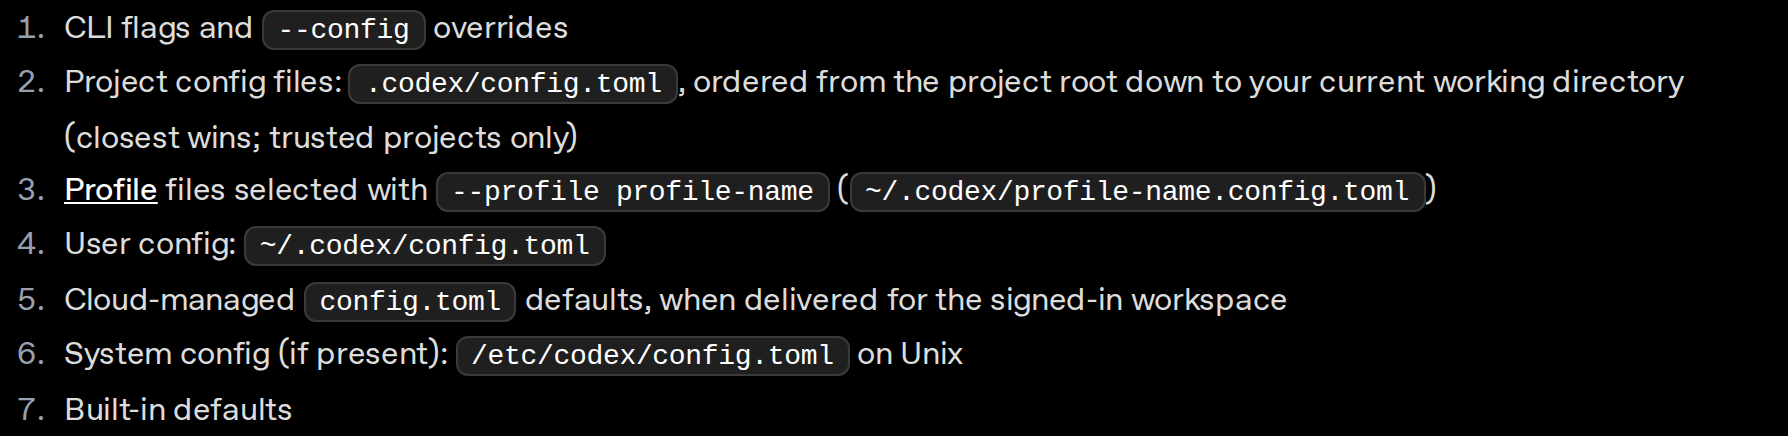
Two details matter in practice:
- Project files load only in trusted projects. Codex walks from the project root to your working directory and loads every
.codex/config.tomlit finds; the closest one wins. If the project is untrusted, Codex ignores its.codex/layers, while your user and system layers still load. - Some keys only work in your user file. Codex ignores keys including
model_provider,model_providers,openai_base_url,notify,profile,profilesandotelin a project.codex/config.toml, and prints a startup warning when it sees them. The docs say to set provider, notification and telemetry keys in~/.codex/config.toml.
Codex config.toml keys you’ll change most
The configuration reference lists every key. These come from the config basics page’s list of options people change most often, plus the provider and the features table:
| Key | What it does |
|---|---|
model |
The model Codex uses by default in the CLI and IDE |
model_provider |
Provider id from model_providers (default: openai) |
approval_policy |
When Codex pauses before running commands: on-request for interactive runs, never for non-interactive runs |
sandbox_mode |
Filesystem and network access while commands run, such as workspace-write |
model_reasoning_effort |
Reasoning effort, such as medium; the levels depend on the model |
web_search |
cached (default), indexed, live or disabled |
[features] |
Turns optional and experimental capabilities on or off |
A small ~/.codex/config.toml built from the docs’ examples:
model = "gpt-6.1-sol"
model_reasoning_effort = "medium"
approval_policy = "on-request"
sandbox_mode = "workspace-write"
web_search = "cached"

[features]
memories = true
The example model needs access for your account or workspace; if you don’t have it, pick one you can use. approval_policy = "untrusted" is no longer supported, so an old file that still has it needs a new value. For a single run, you don’t have to touch the file:
❯ codex --model gpt-6.1-sol# a dedicated flag, for this run only❯ codex --config sandbox_workspace_write.network_access=true# any key, with dot notation; the value is parsed as TOMLCodex profiles: one file per profile
Profiles are named sets of values you switch to with --profile. When you pass --profile deep-review, Codex loads ~/.codex/config.toml, then overlays ~/.codex/deep-review.config.toml. The profile file uses top-level keys and only needs the values that differ from your base config:

Run it with codex --profile deep-review, or codex exec --profile deep-review "review this change". Profile names can contain letters, numbers, hyphens and underscores.
This changed in Codex 0.134.0. Older guides put profiles inside config.toml, and Codex no longer reads them there:
A [profiles.deep-review] table inside config.toml, picked with profile = "deep-review" at the top level.
A separate ~/.codex/deep-review.config.toml with top-level keys, picked with codex --profile deep-review.
To migrate, move each profile’s settings into its own ~/.codex/<name>.config.toml, then remove the old [profiles.<name>] table and the profile selector from config.toml.
Codex MCP servers in [mcp_servers]
There is no separate MCP file. The Codex MCP docs say Codex stores MCP configuration in config.toml: by default ~/.codex/config.toml, or a project’s .codex/config.toml in trusted projects. So the Codex MCP config location is the same table above, Windows and WSL included. The ChatGPT desktop app, Codex CLI and IDE extension share it, so you can switch among them without redoing setup.
Each server is a [mcp_servers.<server-name>] table. A STDIO server, which Codex starts as a local process, needs command; args, env, env_vars and cwd are optional:

A Streamable HTTP server, one you reach at an address, needs url instead. For a bearer token, bearer_token_env_var names the environment variable that holds it. Trimmed from the docs’ Figma example:
[mcp_servers.figma]
url = "https://mcp.figma.com/mcp"
bearer_token_env_var = "FIGMA_OAUTH_TOKEN"
A few more options from the same page:
| Option | Effect |
|---|---|
enabled |
Set false to turn a server off without deleting it |
startup_timeout_sec |
Seconds to wait for the server to start (default 10) |
tool_timeout_sec |
Seconds to wait for a tool to run (default 60) |
enabled_tools |
Tool allow list |
disabled_tools |
Tool deny list, applied after enabled_tools |
For OAuth servers, run codex mcp login <server-name> to sign in. The codex mcp add command can also write the table for you, for example codex mcp add example --url https://mcp.example.com --oauth-client-id my-client, which saves the client ID and callback URL in config.toml.
Keeping config.toml the same on every computer
AGENTS.md lives in the same ~/.codex folder but is its own topic; Codex AGENTS.md setup covers the global file, project files and CODEX_HOME. For config.toml, the usual way to keep two computers alike is a git dotfiles repo. Dotfiles for AI coding assistants maps which Codex files are safe to commit and which hold credentials or transcripts. Check config.toml for OAuth client secrets before you push it.
The other route is SkillPouch, which we make. Per the SkillPouch docs, it syncs these parts of the Codex file:

SkillPouch’s docs list profiles as part of config.toml sync. Separate <name>.config.toml profile files aren’t listed, so check before relying on them syncing.
MCP servers sync as their own items: a server is stored once in the pouch and written into config.toml for Codex and into the config file of each other assistant that supports MCP servers, and SkillPouch changes only the entries it added. Credential files such as auth.json are never synced, and files and item names are encrypted on your computer before upload.
- 1
Install and log in
npm i -g skillpouch, then run skillpouch. Type the code it shows on the approval page in a browser where you are signed in and unlocked, then choose Authorize.
- 2
Keep Codex switched on
skillpouch select lists what this computer syncs; skillpouch select --on codex turns Codex on if it is off.
- 3
Check the synced settings
skillpouch settings list codex lists the synced entries and their status. skillpouch settings exclude stops syncing one entry on this computer; the pouch keeps it.
One limit: sync is not a backup. The background sync docs say a deletion or a broken edit reaches your other computers too, so keep your own backup, such as a git repo, if you need to roll back.
Try it on your own setup
Free to start, end-to-end encrypted, open source. Two commands and your setup follows you.